Getting Started with Spacemacs
I wanted to capture what I like about my editor of choice at the moment. If you’re at all interested in modal editing, or are an experienced Vim user looking for a change, I think there’s a chance you might enjoy Spacemacs. I’ve written this to try and capture what I like about it, and some of the things I wish I’d known when I got started. Hopefully it’s useful to some of you!
Table of Contents
- My history with text editors
- Why Spacemacs?
- So: Getting started
- Cheat Sheet
- Help, I’m Stuck!
- Other Notes
My history with text editors
Probably every 18 months or so, I seem to get an itch about my current editor, and look around for something different. Often it’s because something is behaving slowly, or I can’t get a feature to work. My editors-of-choice over the last 15 years have been, roughly:
- TextMate, because I saw it in the original Rails demo and loved how simple yet powerful it was, particularly the plugins. I have license #12 for TextMate. I used TextMate for a long time.
- Sublime Text, because I saw multiple cursors support. I wasn’t thrilled to switch to Python-based plugins, but knew enough to figure most stuff out.
- Atom, because SublimeText had started to show weird slow-down that I couldn’t resolve, even by wiping my configuration.
- Sublime Text again, because Atom started really slowly, and the previous slowdown seemed to have resolved itself.
- Vim, because a bunch of other people had switched recently and I wanted to see what all the fuss was about. Prior to this I’d only tried Vim a few times and really hated modal editing, but this stint was around 6 months and finally did whatever brain reconfiguration was required to make modal editing make sense to me. Probably I just learned enough of the movement keys to finally feel able to step around files without feeling like I was pecking at the keyboard.
- Atom (again), because they’d focussed a lot on speed recently, and I felt overwhelmed by all the arcane commands and key combinations I needed to learn to use most of the Vim plugins, and because I found exploring projects in Vim to require a lot of energy for me. Sometimes I want to just be able to use a mouse to click around a project structure!
- Spacemacs, because Atom was still relatively slow to launch, and I had hit an annoying edge case in the project search where searching within bundled gems didn’t work smoothly.
I’m sure all of the issues I experienced were largely my fault, rather than any problem with any of these editors, and I’m totally certain that any frustrations I experienced with any of them could be resolved with enough time and patience. However, when I’m sitting down to work on a project that already requires a lot of though, I don’t want to have to give up a lot of that energy to my editor; I need to be able to get it to do what I would like, with a minimum of energy, headscratching, or waiting for a spinny icon to finish.
Why Spacemacs?
Here’s what I really like about Spacemacs:
Modal editing
Much as I was initially resistant to it, putting all that work into using Vim for half a year did finally sink in, and I can pretty happily jump around within a line, or up and down blocks of code, without having to think too hard about it. I don’t know if I would entirely recant my rant, but the simple fact is that I’ve made the sacrifice and my brain has already been trained, so I might as well accept it. I don’t think I’ll ever be zealatous about the benefits of keeping your hands on the keyboard or anything like that, but I can say that once you do get a handle on movement and text manipulation commands, it doesn’t feel too bad.
… but only if you want it
Sometimes though, as a beginner, it’s just faster to use the mouse, or the arrow keys. And Spacemacs totally supports that. If I’m in a bad mood and don’t want to learn the modal way to do something, I can drag and select text, or jump the cursor around, and it just works. I can click on pretty much anything, from files and directories in the file tree, to links in a markdown document, and they do what you’d expect.
It’s this graceful support for non-modal mechanisms that makes it easy to stick with a modal editor through the rough times and the smooth.
Conventionality and discoverability via which-key
The biggest barrier to me sticking with Vim was feeling like “I know there’s a way to do this better” but having to enter the depths of the Google mines to figure out how. Vim is super-extensible and customisable, but the flip-side of that is that everyone has their own setup and key-bindings and so until you are an expert, you end up with a cobbled together configuration of stuff you’ve found on the internet. As I said above, I’m sure that eventually you would get a handle on this and be able to smooth any rough edges, but I think it’s a significant barrier for people who are already trying to internalise a whole new way of editing.
With Spacemacs, the main way you invoke commands is by hitting the spacebar. Press that nice big giant button and after about half a second, a menu appears with a whole bunch of options about what you might press next, with descriptions of what those are.

The commands are organised into sections, all based roughly on mnemonic groupings of what those functions do. So, if you want to do something with a file, chances are that it’s somewhere under the f section. If you want to change the project you’re working on, maybe try p. Want to search for something? Chances are it’ll be under s. Now these mnemonics aren’t perfect (“text” stuff is under x because t was used for “toggles”), but the descriptions are all right there, so the more you look at the menu, the more you internalise which section is which.
Once you get more comfortable, you often don’t need to look at the menu at all, because the combinations become internalised. I don’t need to look at the menu when I want to rename a file, because seeing the menu again and again has helped me learn that it’s SPC f R. Checking the git status of the project is SPC g s. What Spacemacs and which-key do really well is support the learning process, and get you to a point where you can invoke all these commands quickly.
Discovering new functions and key bindings
But it gets even better than that, because you don’t even need to dig around all the the menus until you find the command you were hoping for. If you have an inkling that there should be a more efficient way of, say, making some text uppercase without having to delete and re-type it, you can easily search all of the commands in the editor by hitting SPC SPC and then making a few guesses about what the command name might be. I hit SPC SPC and type “upper”, but none of those look right, so let’s try “upcase”, and bingo, a handful of functions that I might want to use.
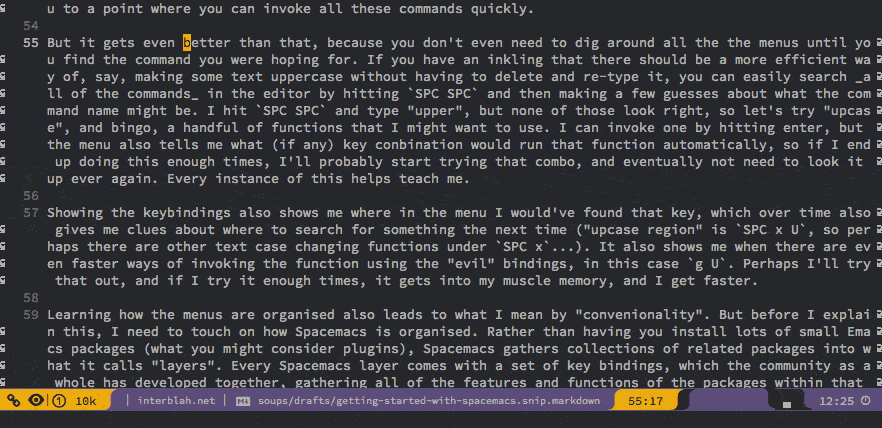
I can invoke one by hitting RET, but the menu also tells me what (if any) key conbination would run that function automatically, so if I end up doing this enough times, I’ll probably start trying that combo, and eventually not need to look it up ever again. Every instance of this helps teach me.
Showing the keybindings also shows me where in the menu I would’ve found that key, which over time also gives me clues about where to search for something the next time (“upcase region” is SPC x U, so perhaps there are other text case changing functions under SPC x…).
It also shows me when there are even faster ways of invoking the function using the “evil” bindings, in this case g U. Perhaps I’ll try that out, and if I try it enough times, it gets into my muscle memory, and I get faster.
Layers and conventionality
Learning how the menus are organised also leads to what I mean by “convenionality”. But before I explain this, I need to touch on how Spacemacs is organised. Rather than having you install lots of small Emacs packages (what you might consider plugins), Spacemacs gathers collections of related packages into what it calls “layers”. Every Spacemacs layer comes with a set of key bindings, which the community as a whole has developed together, gathering all of the features and functions of the packages within that layer together. So when you install the “ruby” layer, you get keybindings to run tests, to invoke bundler, to do simple refactorings, to use your preferred version manager, and so on, all ready for you to use and explorable via the menu and function search.
This is not to say that you can’t change things – you totally can! – but you don’t need to. There are similar distributions for other editors that enable similar “sensible” configurations, so this is not to say that Spacemacs is any better than, say, Janus for vim. but for any of these powerful editors, having something that provides this kind of support is really great.
Magit
From what I can tell, a lot of the love for Emacs comes from people talking about how org-mode is amazing and can do anything and it’s the greatest thing in the world, and that it’s worth switching to Emacs just to be able to harness the awesome power of org1. That might be true. I have not used it. I might discover how to use it tomorrow and achieve a similar text-based nirvana.
As a programmer though, there’s a different tool which has me totally sold on Emacs, and that’s Magit, a package for working with the Git version control system.
I used to be a command-line Git jockey. I’d use git add . and git commit -m "Blah blah", and even run interactive rebasing and patch-based adding from the command line. But if you care about creating a great git history, using git from the command line is working against you.
Magit makes it really easy for me to pick files to stage, or even just pick a few lines from those files, and commit just those changes, writing a great commit message while I do, right in my editor.
I really love Magit. With it can I do pretty much anything I knew how to do at the command line, and more, and it encourages me to write the best commit messages I can, and to keep my history tidy too. As far as I’m concerned, Spacemacs is a pretty decent editor with nice ways of teaching and reinforcing how to efficiently edit text, but Magit is a superpower.
So: Getting started
The title of this post is “getting started”, so I’m going to try to share what I did to get going with Spacemacs, in the hope it helps you get started quickly, and see some of the nice features that I’ve been enjoying.
As a caveat, let me say that I use a Mac, and I’m a Ruby developer using Git, so these notes are from that background, rather than a comprehensive set of instructions that will work for everyone.
Installation
Installing Spacemacs is pretty simple. Firstly, you’ll need Emacs. There are a few packages available via Homebrew:
emacsemacs-plusemacs-mac
I use emacs-mac because it has patched which enable pixel-level scrolling, and it can also be configured to run without a title bar, which I like because I tend to run Emacs maximised (but not “full screen” since that means something else these days in MacOS).
brew tap railwaycat/emacsmacport && brew install emacs-mac --with-no-title-bars --with-spacemacs-icon
One significant caveat of installing without title bars is that you can’t then drag the window around using your mouse. This can be a real pain, but if you always run Emacs maximised, it doesn’t matter. Unless you know you want this, I’d suggest installing without that option. You can use brew info emacs-mac to see all the installation options if you like.
Ripgrep
While we are at it, also install ripgrep, the super fast search tool that understands version control systems like git:
brew install ripgrep
Spacemacs will then use this tool to do fast searching. Next, install Spacemacs according to their instructions:
Getting Spacemacs
I would encourage you to just follow the instructions on the Spacemacs site, but the gist is this:
git clone https://github.com/syl20bnr/spacemacs ~/.emacs.d
Currently there’s a general recommendation to use the “develop” branch of the Spacemacs repository, since the “master” branch hasn’t seen much attention in a while. I find this a little odd, but that’s how they like to run the project I guess. So:
cd ~/.emacs.d && git checkout develop
Next, start up Emacs! You should see the Spacemacs home screen, and you’ll be prompted to answer a number of questions about how you’d like Spacemacs to be set up. I’d suggest you pick “Evil” as the editing mode, unless you know you don’t want to try to use the Vim-like modal system. Also, pick the “standard” distribution, rather than the minimalist one. Or at least, that’s what I did.
Now Spacemacs will set to downloading a whole bunch of packages and installing them, and this will take a few minutes. This is a perfect time read the Quickstart documentation while you drink your weak lemon drink.
Configuring your installation
Once all the packages have been installed, you’ll be presented with a simple help screen. Read it – it’s going to cover the basics fairly well. If you like, you can dive straight into editing files (take a look at the Cheat Sheet below which might help), but personally, I always like to see what I can tweak when I work with a new editor so once you’re done reading that, hit SPC f e d to open your personal configuration file. This is where all of the installed layers are declared and configured. I’m going to share the settings that I’ve used, but by all means tinker.
Layers
Here’s roughly what my layer configuration looks like:
javascript
coffeescript
yaml
(osx :variables
    osx-use-option-as-meta nil)
helm
(auto-completion :variables
                 auto-completion-tab-key-behavior 'complete)
better-defaults
emacs-lisp
neotree
git
github
markdown
org
(shell :variables
       shell-default-height 30
       shell-default-position 'bottom)
(version-control :variables
                 version-control-diff-side 'left
                 version-control-global-margin t)
(ruby :variables
      ruby-version-manager 'chruby
      ruby-deep-indent-paren nil)
(ruby-on-rails :variables
               feature-use-chruby t)
html
dash
The lines which aren’t wrapped in parentheses just use whatever defaults exist for the layer. Those that are (e.g. osx or shell) have been configured by me a little. Looking at the layer documentation will explain those settings, but the interesting parts there are that I’ve “unconfigured” the right alt key as the Emacs “meta” key, because I need that key to type # characters.
I’ve also set the Ruby version manager to be “chruby”, but you might need something else. If you want to stick with the defaults, just delete :variables and everything after it, and remove the parentheses.
Other settings
dotspacemacs-maximised-at-startup t
I tend to run Emacs full screen, so I want it to start that way.
dotspacemacs-line-numbers t
Always show line numbers in every file
dotspacemacs-whitespace-cleanup 'changed
For any lines that I have edited, make sure there are no trailing whitespace characters, but otherwise leave other lines untouched. I find this is the best compromise between keeping whitespace in check, but not having commits full of unrelated whitespace changes just because I touched a file that had some.
That’s it for the Spacemacs options, but you can configure other stuff inside the dotspacemacs/user-config function. Here’s a few things that I have:
;; Use two spaces as the tab width
(setq-default tab-width 2)

;; Make the modeline look good on Mac OS X
(setq powerline-default-separator 'utf-8)

;; Make the right alt key available as meta in case that's useful
(setq ns-right-option-modifier 'meta)
(setq mac-right-option-modifier 'meta)


;; When saving using cmd-s, exit back into normal mode so that other vim-ish commands just work
(global-set-key (kbd "H-s") (lambda nil (interactive) (evil-force-normal-state) (call-interactively (key-binding "^X^S"))))
;; Note that the "^X^S" string above actually needs to be the proper `ctrl-x ctrl-s` characters, which I can't embed in my blog. Best copy them directly from my dotfiles at https://raw.githubusercontent.com/lazyatom/dotfiles/spacemacs-develop/dotfiles/spacemacs

;; Make cmd-t open the project file finder, like other editors
(evil-define-key 'normal 'global (kbd "H-t") 'helm-projectile-find-file)

;; Include underscore in word movement commands for Evil mode
(dolist (mode-hook '(ruby-mode-hook enh-ruby-mode-hook python-mode-hook js2-mode-hook haml-mode-hook web-mode-hook))
  (add-hook mode-hook #'(lambda () (modify-syntax-entry ?_ "w"))))

;; don't align if statements to the if
(setq ruby-align-to-stmt-keywords '(if begin case))

;; set fill-column with for git commits to recommended width
(add-hook 'git-commit-mode-hook (lambda () (setq fill-column 70)))

;; Follow symlinks to files without complaining
(setq vc-follow-symlinks t)
OK, enough configuration. Let’s actually start editing some stuff!
You’re a vimmer now, ‘arry
First thing’s first, you’re going to need to get used to modal editing. Covering that is way outside of the scope of this article, but here’s some basics.
You’ll start in “normal” mode, which is for moving around, and for manipulating text without actually typing new stuff (so, like, moving lines, copying and pasting and deleting and so on).
If you want to enter some text, you’ll need to enter “insert” mode. There are a few ways to do this, but one is just hitting “i”. Then you can type as much as you like, and hit ESC when you are done to get back to “normal” mode.
To move the cursor around in normal mode, the vimmish way is by using the hjkl keys, which correspond to left, down, up and right. Left and right are pretty obvious, but I used to often get confused which of j and k was up or down. The best way I’ve heard of to remember this is that j looks a little bit like a down arrow, if you can stretch your imagination to that. Bear that in mind and it’ll soon become second nature.
There is a “lot” more to editing using Vim-like commands, and you’ll spend most of your time doing that, so if you’re not very experienced, I would suggest trying out one of the various vim tutorials. There’s even one built in to Spacemacs (SPC h T)!
Editing files and projects
Spacemacs uses a package called projectile to manage projects, but it can be a little unclear how to actually get started with this. Here’s a simple way to get into it.
You can browse the list of projects that Projectile knows about with SPC p p. However, when you get started, this list will almost certainly be empty. Projectile considers a project as any directory that’s under version control. Projects don’t really exist until Projectile discovers them, and the best way of doing that is by opening a file within that directory.
Hit SPC f f to start browsing for a file to open. You can start typing and hit TAB to autocomplete directory and file names, or use ctrl-h to jump up to parent directories to move around quickly. Once you’ve found the file, hit RET to open the file.
Depending on the type of the file, you might be prompted to add a new layer to get all the features for that type of file; it doesn’t really matter what you choose at this point.
Once the file is open, if you hit SPC p p again, assuming you’ve opened a file that was somewhere under version control, you should now see the project in the list, and you can get back to this project easily now.
When you do select a project using SPC p p, you’ll next be prompted to pick a file from that project. For a long time, this confused me, particularly as I moved from one project to the other, and back, in a single editing session. However, this is normal – Spacemacs is just asking which buffer or file from that project that you want to start on.
Cheat Sheet
These are all the commands that I wish I’d known when I got started. It’s also very worth getting a grounding in Vim, including the keys I listed nearer the top of this article; here I’m just including the Spacemacs-specific commands that cover the basics.
Spacemacs includes many other commands, and likely some of them will be better in certain situations than the ones I’ve listed. These are just the basic ones that kept me moving.
Modal editing
These are the basic commands that I use all the time:
hjklfor movement, although I will pretty happily use arrow keys to move around a little when I’m in insert modewandb(and<num>wand so on) to skip around words at a timexto delete the character under the cursorr<char>to replace the character under the cursor with a new onef<char>to skip to a specific character (and to a far lesser extent,<num>f<char>, but the time I spend visually counting occurrences almost always outweighs just doingf<char>a few times){and}to jump up and down blocks of code. Basically, it moves to the next blank line, but if you’ve formatted your code nicely, more often than not this is the next functioncwandct<char>to change the current work, or change to the given character (e.g. givensome_variable_name, with my cursor at the start I might typect_to edit just thesomepart)dwandddto delete words and linesoto add a new blank line below this one and enter insert modepto paste whatever I’ve recently deleted somewhere elseAto go to the end of the line and enter insert mode (“Append”)^and$to skip around between the start and end of linesggandGto move to the top and bottom of the file respectivelyveandv$to select the word or line, ready to do something with it (maybeyto copy it…)- Getting used to hitting escape as often as possible to leave insert mode2.
There’s a bunch more that I do know and use, and I am certain that I could be using different commands to do a lot of stuff more efficiently, but I think it was really internalising the commands above that got me through the transition from feeling massively slowed down to reasonably efficient at editing and moving text around.
All of these are Vi/Vim commands, but Spacemacs implements them using a package called “evil”, which according to all the reckons on the internet that I’ve read, is hands down the most complete Vim emulation layer available. What this means is that any advice or tricks my Vim-using friends might have, I can also use too, and that’s pretty neat.
General
f d - in rapid succession, will quit out of most menus/commands/minibuffers back into normal mode
ctrl-g - tell Emacs to quit something that’s taking too long
SPC q q - quit Emacs
SPC q R - restart Emacs
q - if you’re in a non-file window, chances are if you hit q, it’ll close that window. Give it a try.
Files, projects and buffers
SPC f f - browse for files and open them
SPC f r - browse for a recently-opened file
SPC f R - rename the current file
SPC f D - delete the current file
SPC p p - show list of projects to choose (you will be prompted to open a file in that project afterwards)
SPC p f - file a file within the current project
SPC p b - show a list of all open buffers for this project (buffers are sort of like “open files”)
SPC b b - show a list of all open buffers
SPC b d - delete a buffer, which basically means “close this file, I don’t want to see it anymore”
SPC TAB - switch back to the previous buffer
SPC f t - toggle open a file tree (use shift-k to go up to parent directories in it)
Windows
SPC w / - split a window vertically
SPC w s - split a window horizontally
SPC 1/2/3...9 - jump to window 1 to 9 (you should see the window numbers in the little mode line)
SPC 0 - jump to the file tree (if it’s open; might actually open it if it isn’t)
SPC w d - close the current window
SPC w m - make the current window the only window
Searching
SPC / - search every file in the project
SPC s s - search (“swoop”) in the current buffer
SPC * - search the current project for the symbol/word under the cursor
* - enter a powerful search “mode” for the symbol/word under the cursor
Editing
SPC i k/j - insert a blank line above or below the cursor without entering insert mode
SPC ; ; - comment out a line of code (although now I know about g c c and all the other Vim-ish g c commands)
Development specific stuff
, t b - run all the tests/specs in this file
, t t - run the test/spec at the cursor
SPC c d - close the test window (“c” is for compilation)
SPC c k - quit the current test run
SPC p a - switch to the alternate file for this one (e.g. from controller to controller test, and back)
Git
SPC g s - open git status. Then hit ? to see the keys that Magit understands. Note that case is important. Hit q to close the Magit buffer.
Spacemacs itself
SPC f e d - open your configuration file
SPC f e R - reload your configuration after editing that file
SPC f e D - compare your configuration to the default one. This is super useful when you’ve updated Spacemacs, since new configuration options become available. When you do this, you enter an “ediff” mode; hit ? to see what keys do, but the basics are: press n and p to move between changes, then a or b to pick which option to use, and q to quit
SPC SPC - search for a function by name, and run it. This is a great way of getting a sense of what Emacs/Spacemacs can do
Documentation and help
Emacs and Spacemacs come with a huge amount of documentation built in, which is extremely useful when you’re trying to figure out how to do something.
SPC h l - search for a layer and then open its documentation, which will show all its configuration options and key bindings
SPC h d f - search for a function and show its documentation
SPC h d v - search for a variable and show its documentation, and current and default values
SPC h d p - search for a package and show information about it
SPC h d k - then enter any combination of keys, and Spacemacs will tell you what function they are bound to and what it will do.
Help, I’m Stuck!
As with any complicated bit of software, it’s possible to get stuck in a menu or lost in some options, and want to back out. Sometimes key bindings you expect to work, will not, because you’ve ended up in one of the “system buffers” that Emacs uses to store command output or something else. Don’t worry – it happens to everyone.
The best way I’ve found to re-orient myself is to hit SPC f r or SPC b r to open the recent file or buffer list, and then get back to a file that I was working on. From there, I can normally get back to moving around my project like I expected. Worst case, just quit (SPC q q) and open Emacs again.
Other Notes
Spacemacs works just as well in the console version of Emacs as the GUI one, so you can happily sync your configuration to remote machines and use everything you’ve learned when editing files on remote servers. And take a look at “Tramp” if you’re interested in another Emacs superpower involving remote files!
Even though I’ve been using Spacemacs for the best part of a year now, I only recently actually read through the documentation (SPC h SPC RET inside Spacemacs, or here). There’s a lot of good stuff in there, particularly about the evil keybindings, and things like managing layouts and workspaces. Once you’ve gotten to grips with some of the basics, I highly recommend just browsing it, and then coming back to it every now and again, to see what jumps out in an “ah! I can use that” kind of way.
I hope this has been useful, either if you’re curious about Spacemacs, or are playing around with it. Thanks for your time!